Tuesday, November 27, 2012

Jenn's Pineapple Upside-Down Mini Cakes


One of the most interesting things about dealing with gluten intolerance and celiac disease is the ability to discern the same symptoms in other people. My friend, Jenn Ever, was one of those people. A co-worker for many years, we shared a lot of food (and a few drinks) together over the years. And as girls who work in salons do, we also shared a lot of personal life info. 

One day I was explaining my new learnings about gluten and my intolerances, Jenn suddenly realized she had many more symptoms of celiac disease than I did. She read the books I was reading and did a lot of searching. It turns out all her aliments and childhood physical issues could be related to her long term ingestion of gluten and she was excited to learn about how to feel less bloated and have less arthritis symptoms-she's a much healthier person and feels fabulous. 

All these years later she still avoids gluten and continues to be an inspiration to me...especially when I get to try the recipes she comes up with! I am sharing with you her newest creation, the retro inspired Pineapple Upside-Down Mini Cakes...


Signed, 
Charlese


Jenn's Pineapple Upside-Down Cake

1 box Gluten Free Cake mix (Cherrybrook Farms, Betty Crocker, or any you prefer)

ALL ingredients your box recipe calls for PLUS:
Coconut oil (instead of the oil your mix calls for)
1 can crushed pineapple
1 stick butter, melted
1 tsp gluten-free vanilla extract
1 jar Maraschino cherries
1 c Brown Sugar

1 cupcake pan, greased


Set oven to preheat for temp suggested by the cake mix. Mix the batter according to manufacturer guidelines, substituting coconut oil for the oil or butter in the same amount requested. Add 1/2 can of crushed pineapple and the teaspoon of vanilla, incorporate well.

In the greased cupcake pan, into each cupcake cup pour about 1 tablespoon of melted butter plus a sprinkling (up to 1 tablespoon) of the brown sugar. Also add to each cupcake cup 1 cherry and 1 tablespoon of crushed pineapples. Then add the batter, to just under the top of the cupcake cup.

Bake at the same temperature it was preheated for about 22 minutes, checking to make sure it's cooked through and not burning. They will be moist and juicy. After a few minutes of cooling, flip them upside down to reveal the rounded cherry tops! Enjoy!


Thursday, November 22, 2012

Makin' Banana Pancakes...


Not long ago I was singing along to Jack Johnson's "Banana Pancakes" and thought, "Would I even like banana pancakes? How do you make them? How do you make them gluten free?" I realized maybe I couldn't benefit from the true-ness of feeling in the Banana Pancakes song without having experienced a banana pancake morning myself. And yet I hadn't bothered to try it. Or so I thought...

When I was in Maui this summer, I ate my favorite breakfast at my favorite breakfast place in the world (Sea House Restaurant) and I sure was super excited that they made my dutch baby pancakes with caramelized pineapples-gluten free! Then while I was looking at my favorite bay (Napili) and eating my favorite breakfast  (Haleakala Pancakes with Eggs and Pineapple Chicken Sausage) I realized the other sweet taste in my mouth was the caramelized bananas that accompanied the pineapples. This breakfast that I had immensely enjoyed was my first version of banana pancakes!

I began to realize I must learn to create this delicious meal for myself and since I already know how to make Gluten Free Bisquick pancakes, I would simply add a few things to make these even better than the box recipe-including adding caramelized bananas. Then I made it more healthy by making my own buttermilk with non-dairy milk and coconut oil. Use my directions, but add your own flair too!

---Signed,
Charlese


Gluten and Dairy Free Banana Buttermilk Pancakes
(makes 8-10 Medium Sized Pancakes)


FIRST: To make buttermilk, take your milk of choice. To 1 cup add 1 Tbs of vinegar (recipes call for white, but I used apple cider vinegar. You choose, but stay away from balsamic and malt versions for taste and gluten content). Stir and allow this mixture to sit for 5 minute before using.


1c Gluten Free Bisquick
1c Non-dairy Buttermilk
2 Tbs Organic Virgin Coconut oil, softy melted (+ 1-2 Tbs for the skillet)
1 large egg (or egg substitute if required)
1 Large banana, thinly sliced 1/8" 


 In a medium bowl, pour Bisquick in first. Then slowly add each wet ingredient while whisking to a smooth consistency.

Heat up the skillet and lightly grease with 1-2tbs coconut oil or non-stick spray as desired to keep from sticking.

Pour your desired size pancake onto the skillet and allow to cook until bubbly. Before flipping, add the slices of banana to the wet side in a circular pattern. Leave space between, do not overlap banana slices. Carefully flip onto the banana side. The top should be a perfectly browned pancake.


When that side is finished cooking, the bananas will be caramelized and the pancakes will be completely cooked. If necessary, flip over and brown longer until desired finish. Do not smash or flatten with your spatula. Serve alone or alongside your breakfast favorites. Enjoy!


Wednesday, November 14, 2012

The Most Delicious Pot Roast Collaboration Meal!

      Recently we "gluties" haven't had time to blog, but we always have time to eat deliciously and gluten free. We were recently inspired to start sharing our tips again after we had the MOST delicious meal last weekend, that we made together ourselves. It's a true collaboration...Silvia made the main dish and Charlese made the sides and chocolate cake for dessert!  This meal was called "the most delicious gluten free meal ever" by a very picky friend, so we hope you enjoy it as much as we all did.

Pot Roast Collaboration Meal:
Crock Pot Roast w Rustic Gravy
Bacon Rendered Green Beans
Scalloped Yams with Gruyere
Braised Romaine Hearts with Balsamic Gorgonzola Reduction
Hurley Mom's Chocolate Applesauce Cake


Crock Pot Roast with Rustic Gravy

1 (5 pound) 7 bone-in Beef Chuck Roast
1 Tbs Potato Starch, or as needed to coat meat
2 Tbs Olive Oil
1 med Onion, chopped
4 Cloves Garlic, minced

3 Carrots, chopped
2 stalks Celery, chopped

1 Tbs Herbes de Provence
1 Tbs Tomato Paste
1 1/2 c Beef Broth
1 Sprig Fresh Rosemary
2 Sprigs Fresh Thyme
1 Bay leaf

Salt and Pepper
Cornstarch, for Gravy

Prepare roast with a sprinkle salt and pepper, then follow with a light sprinkle of the potato starch. In a hot saucepan, add olive oil and then quickly brown beef on all sides. Remove from pan. Add onion, garlic, carrots and celery and sauté with Herbes de Provence just until onions are slightly soft. Turn off heat and pour vegetables from pan into to crock pot, then add tomato paste and beef broth. Finally add roast and put rosemary and thyme sprigs plus bay leaf on sides of the meat. Set on LOW for about 8-10 hrs. Drain fat periodically when needed. To serve, remove bay leaf and sprigs and serve with veggies and rustic gravy.


Rustic Gravy: Spoon about 1-2c of leftover sauce from crock pot into saucepan and warm, do not strain. Add 1/2c cold water and cornstarch to desired thickness. Salt and Pepper to taste.


Bacon Rendered Green Beans

1 Lb of Organic Green Beans, cleaned and trimmed 
2 slices of Applegate Farms organic Bacon, chopped
1 Tbs of butter
Salt and Pepper

Saute bacon pieces in a large saucepan until soft, not crispy. Leave in pan and add green beans. Toss with bacon and sauté for a minute or two, then add lid to steam until soft. Remove lid and continue to sauté until browned and bacon is crispy. Toss together a few times and add salt and pepper to taste.


Scalloped Yams with Gruyere
(recipe was shared with by a friend who was also an acclaimed chef for an Orange County restaurant)

3 Large Organic Yams, unpeeled
1 Tbs butter, softened
1c Heavy Cream
2-3 c Shredded Gruyere (Trader Joe's Gruyere/Cheddar blend)
1/2 c Crumbled Gorgonzola
Dried Thyme
Salt

Preheat oven to 350. Slice yams to a medium thickness. Using a 13x9 casserole pan, pour softened butter onto base and coat. Add first row of yams. Pour small amount of cream and add sprinkling of cheese plus thyme. Layer yams again and repeat. Finish with top row, perfectly scalloped (layered) yams, rest of cream, and plenty of cheese and thyme.

Bake 45 min at 350 or until top layer of cheese is browned. Allow to rest 15-30 minutes, then serve.


Braised Romaine with Balsamic Gorgonzola Reduction

2 Organic Romaine Hearts
1Tbs Olive Oil
1 c Crumbled Gorgonzola
2 c Balsamic Vinegar

Slice romaine hearts, lengthwise, in half. Using a grill pan, heat olive oil and add romaine, flat side down. In a small saucepan, add balsamic vinegar and slowly heat until it reduces to a syrup consistency and add gorgonzola. Remove romaine when warm, before it withers. Serve with balsamic reduction poured over and sprinkle with additional gorgonzola if desired.


Hurley Mom's Chocolate Applesauce Cake
(this recipe was given by a dear client and friend with celiac disease who's loving mom prepared some special homemade desserts just for her and this one she shared with us)
This is a very rich and chocolately cake that has an oozy gooey texture. It is absolutely delicious, enjoy!

1 1/2 c White Sugar (we used Trader Joe's Organic sugar)
1/2 c Canola Oil
2 eggs (we used flax meal egg substitute: 1 egg= 3 Tbs water + 1 Tbs flax meal and allow to sit)
2c Applesauce, not chunky
2 c Pamela's Baking and Pancake Mix (gluten free flour mix)
1 1/2 tsp Baking Soda
1 tsp Ground Cinnamon
2-3 Tbs Cocoa (we used Trader Joe's Baking Cocoa, it's the best!)

1 c Chocolate Chips (we used Ghiradelli)
2 Tbs Brown Sugar

Preheat oven to 350 and oil and flour a 13x9 baking pan.
Cream together sugar, oil, eggs (or substitute), and applesauce with hand mixer or in stand mixer. In a separate large bowl, sift together Pamela's Baking Mix, baking soda, cinnamon, and cocoa, then add to wet ingredients and mix until incorporated. Pour into baking pan and sprinkle chocolate chips and brown sugar onto wet mix before baking (see photo above). Bake at 350 for 45 minutes. It will be gooey in the center, but shouldn't be too wet when tested with a fork or toothpick. Allow to rest and cool before serving.


Sunday, October 9, 2011

Gluten-Free Chocolate Cake Mix, Really!


Ok, let's be straight about this. A LOT of gluten free pre-packaged mixes are horrible! Horrible how? That depends on the brand. Bad flavor, bad consistency, ugly to look at...oh, and not cheap either! If you read my other recipes, you may notice my recommendations for baking usually include modifying regular recipes with a general gluten free flour mixture. But once in awhile there is a pre-packaged mix worth using and the best is worth mentioning here. Sof'ella brand Chocolate Cake Mix. I purchase it at Fresh and Easy supermarkets and don't have to modify anything*! Be aware it makes a small batch, maybe about 2/3 of what you are used to with other commercial gluten brands of cake mixes.

* Except for VEGANS who can easily use Flaxseed Meal or Egg Replacer instead of eggs and Coconut Oil or Canola Spread instead of butter.


Today I had a baby shower to attend and I made the dessert, so I made Sof'ella cupcakes with Cream Cheese Frosting. I used the exact directions on the box, which you need to follow in order, exactly. I then made frosting, the recipe to follow, using yellow cupcake cups and making the frosting blue. There are so many ways to change this for fun or taste, but always start with Sof'ella when making chocolate cake!


Cream Cheese Frosting
8oz block of cream cheese
8oz/1.5 sticks of butter
1 Tbs vanilla extract
2 cups powdered confectioner's sugar

Food coloring to taste
Decorations as desired

Cream together cream cheese and butter with mixer, then add vanilla. Slowly add sugar, one cup at a time. Finish with food coloring. Refrigerating makes it set up well. Add to cooled cupcakes and decorate!

Thursday, April 21, 2011

Olive Garden Pasta Soup Recipe

Ok, I haven't made this yet...but a client shared this Olive Garden Soup recipe. Of course I modified it to be gluten free...


Olive Garden Pasta E Fagioli Recipe
INGREDIENTS:
3 teaspoons Oil
2 pounds Ground beef
12 ounces Onion; chopped
14 ounces Carrots; slivered
14 ounces Celery; diced
48 ounces Tomatoes; canned, diced
2 cups cooked Red Kidney beans
2 cups cooked White kidney beans
88 ounces Beef stock
3 teaspoons Oregano
2 1/2 teaspoons Pepper
5 teaspoons Parsley; (fresh chopped)
1 1/2 teaspoon Tabasco sauce
48 ounces Spaghetti sauce
8 ounces dry pasta Shell macaroni; or other GLUTEN FREE PASTA
PREPARATION:
Saute beef in oil in large 10-qt. pot until beef starts to brown. Add onions, carrots, celery and tomatoes and simmer for about 10 minutes. Drain and rinse beans and add to the pot. Also add beef stock, oregano, pepper, Tabasco, spaghetti sauce, and noodles. Add chopped parsley. Simmer until celery and carrots are tender, about 45 minutes. 
COOK'S NOTES:
Just cut the recipe in 1/2 for smaller family needs! 

Sunday, January 23, 2011

Seattle Oatmeal Chocolate Chip Cookies (Flourless)

Oatmeal Cookies 

Let's talk oatmeal. There is a little controversy about gluten free and oatmeal. The thing about regular oatmeals are that they are processed in factories that process and chop wheat. So there is a chance that your oatmeal will be touching machines that have touched flour and the chaff that flies from the cut wheat may float over to and enter the oatmeal. Your risk is that of cross contamination and possible miniature incremental amounts of  wheat particle. Many don't notice anything with consumption of non gluten free oatmeal, but for the most sensitive and those whose doctors have stressed the importance of staying away from any contamination of gluten, you can buy gluten free oats. The problem is, they are usually old fashioned style oats and many cookie recipes call for quick cooking oats. The difference results in different cooking times and different textures. Old fashioned oats should be mixed into cookie dough and then refrigerated for 20 minutes before baking for a less. They do result in chewier instead of flakier texture, so there's another bonus. The negative is the extra time and cost of gluten free oats, but they will be chewier and safer for some diets. The use of almond meal replaces flour and adds a hearty texture, which is perfect for oatmeal cookies. Use this in many recipes as a partial flour substitute.

This recipe was adapted by one submitted by my friend, Jenn Unocic in Seattle. Enjoy!


Seattle Oatmeal Cookies (Flourless)


3/4c butter
1 c brown sugar
1c white sugar
2 eggs (substitute egg replacer or flaxmeal mix)
1tsp vanilla
2c almond meal
2 c rolled oats (quick cooking)
1 tsp baking powder
1/4 tsp baking soda
pinch of salt
1 bag chocolate chips
1/2 bag butterscotch chips
1/2c chopped nuts (optional)

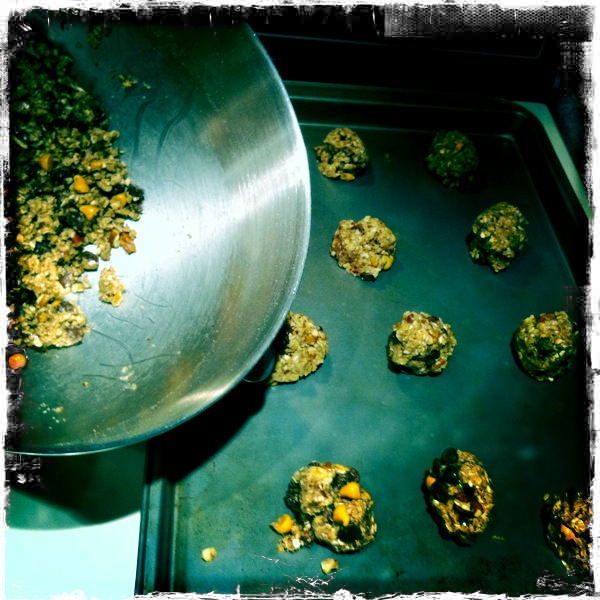
Preheat oven to 375 degrees. In mixing bowl, add butter, sugars, eggs, and vanilla. Cream together. In another bowl, mix almond meal, oats. baking powder, baking soda, and pinch of salt. Add this mixture to the ingredients in mixing bowl. Mix together and add chips and nuts, until just mixed. Squeeze into tight balls and sit them a couple of inches apart on your baking sheet. Bake for 10 minutes, cool, and enjoy!


Tuesday, January 18, 2011

Ratatouille

Ratatouille, the Perfect Gluten-Free Side Dish

What is ratatouille and why should gluten free eaters be interested?  More than a cartoon name, this vegetable based dish is a healthy, simple, and delicious option to add to any meal. As a happy meat eater, I am constantly looking for new sides to add to my meals. And to my veggie loving friends, the eggplant and hearty squash make for a great centerpiece for a Vegan meal.

I discovered ratatouille after watching the cartoon, and knew I had to make it as soon as I got home from the theater. It turns out it's the easiest and most versatile vegetable dish. However, it's always about the same basic ingredients. This recipe is more of a general guide to how I start, leaving you plenty of room to be creative.

Most important thing to remember? Use fresh, firm vegetables!

Basic ingredients: Zucchini, Eggplant, Yellow Squash, Onion, Garlic, and Tomatoes/Sauce.
Basic directions: Chop or slice vegetables to any size or shape that you prefer. Saute onion and garlic in olive oil, then add veggies and cook until soft. A pat of butter or margarine will add a delicious flavor at this point. Next add tomatoes and/or sauce, then add spices to your desired flavor. I use basil, oregano, cayenne pepper, chili powder, salt...which gives it an italian flavor. Allow to simmer, stirring occasionally and serve alone, over polenta or on the side of your main dish. Have fun!!!